


[Images by BUILD LLC]
With every residence we complete, we make moves towards improving upon our design, detailing, and construction. The recent completion of the Case Study House 2016 (CSH2016) is a mile marker, as it confirms several design hypotheses of living room design involving the entertainment wall. This feature in most living rooms includes the firebox, flat screen, mantle, and AV cabinets. Each of these items has its own design factors and considerations; subsequently designing a singular system in which they complement each other is a challenge that’s taken years of design testing.
As much as us architects love to explore and experiment, some of the most gratifying moments are actually in the realization that the parameters and considerations of a particular design challenge result in a distinct solution; an answer that brings all the design considerations into a harmonious balance. The entertainment wall illustrates this scenario quite well, and today’s post takes a detailed look at each of the four design components that lead to the overall solution.
The Firebox
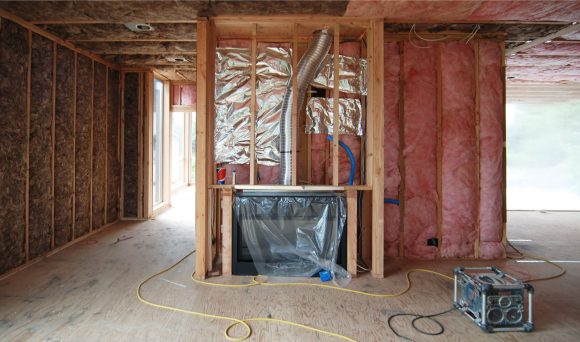
With the holidays just weeks away, it’s an excellent time to discuss firebox design. The warmth and visual coziness offered by fireboxes add significant character to the common area of a home, while serving the resale value of a custom residence. The radiating heat helps organize the furnishings and provides a focal point within the living room. In some families, it also provides a convenient narrative (however dubious) of how Santa Claus makes his annual entrance. BUILD typically specifies the Montigo L Series or the Heat & Glo Cosmo Series. We prefer these units because they’re UL listed (a requirement in most jurisdictions), they’re reliable, the fire component is wide enough to hold its place visually in the room, and the units aren’t over-designed with unnecessary ornamentation. But as desirable as these fireboxes are, the size of a modern, linear gas firebox can present a design challenge in the living room. While the glass opening may appear sleek and attenuated, the mechanics of the firebox itself are actually quite large (in the neighborhood of 30”-40” tall for the units mentioned above). Also, because access to the mechanics needs to be maintained, the concealed box can sit no lower than the structural sheathing, limiting how low the glass opening can be located. The image below shows the Montigo L42DF unit installed during framing of the CSH2016.
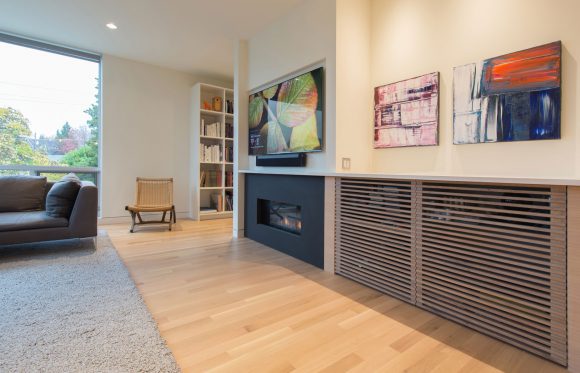
There are also several required offsets from the firebox to ensure that adjacent living room components won’t be adversely affected by the radiating heat. The mechanics of the firebox, along with the offsets, take up a significant amount of the vertical real estate of a living room. This is dealt with by using a custom, removable, steel face panel which defines the firebox window and allows full access to the mechanics beyond. This steel face panel is blackened to allow the flames to be the prominent feature and to visually balance out the flat screen, as seen in the completed CSH2016, below.
The Flat Screen
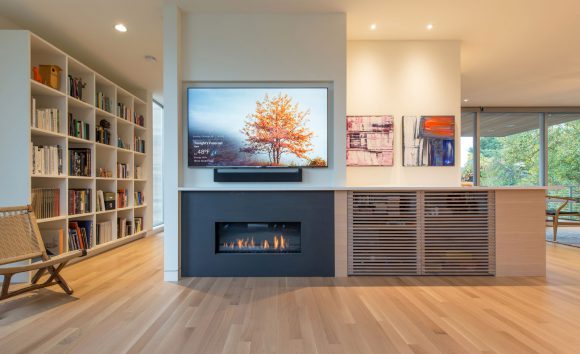
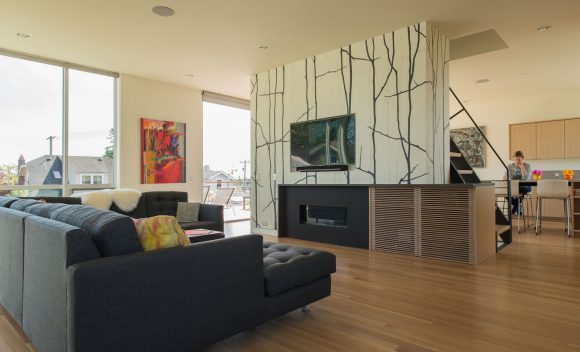
The first step of achieving design harmony is admitting that you have a flat screen. For years we tried to devise ways to conceal, hide, or disappear the flat screen so that it didn’t become the dominant visual feature within the living room. However, flat screens continue to increase in size, diminish in price, and grow in the necessity of our daily routines. Instead of trying to camouflage the flat screen with varying degrees of success we’ve come to the very real conclusion that this component is present in most living rooms and needs to be designed into the equation, as in the CSH2014 below.
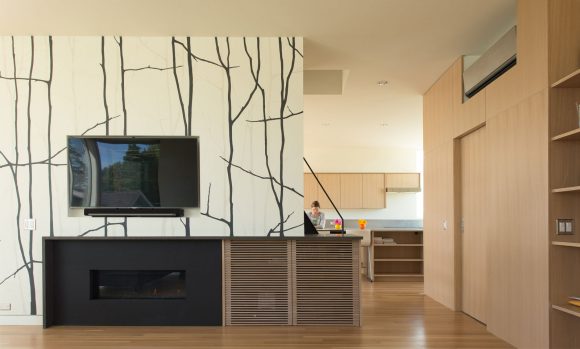
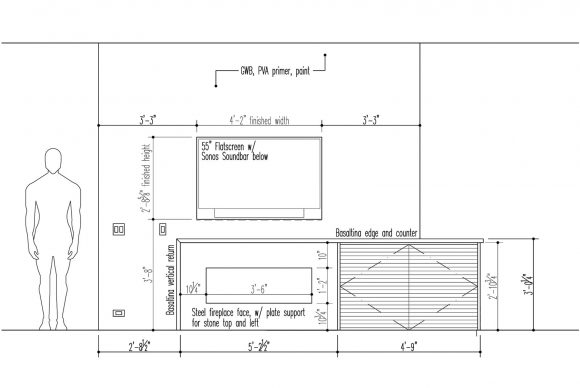
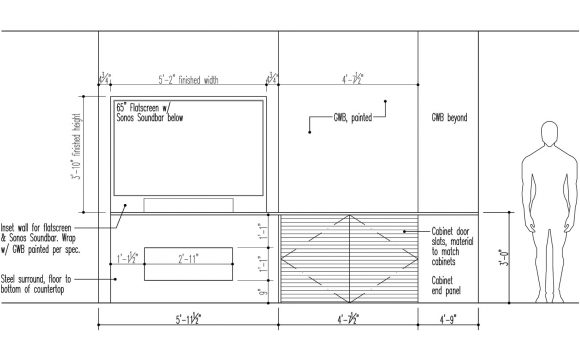
We tend to locate the flat screen directly above and centered on the firebox. This maintains a symmetry and organizes the visual features of the living room to a common location. While clear in concept, the simple relationship has several dependencies. While being viewed, the flat screen needs to be low enough for proper viewing from the sitting position, but high enough to clear the mechanics and heat offsets of the firebox. There’s also the consideration of a sound bar, typically located underneath the flat screen. We prefer the Sonos Playbar as it greatly improves the audio quality of the flat screen, but it requires an additional 5-10 inches of vertical height and also needs proper clearance from the radiating heat below. For this very reason, we find it useful to include a subtle mantle into the design composition.
The Mantle
In addition to the required clearance prescribed by the firebox, a protruding mantle above the firebox drastically reduces the heat exposure of the flat screen and possible Playbar above. Because of their inherent heat resistance, we typically use an engineered stone like Basaltina or PentalQuartz. The dimensional requirements of the firebox usually set this mantle at about 36” and, when continued horizontally, it makes for a handsome design datum within the room. In the CSH2014 example below, the Basaltina is used to visually separate the oak cabinets below from the white walls above, while the dark flatscreen and firebox balance each other vertically. The mantle in this case extends out over the cabinet and firebox and returns vertically down the side to define the edge. The wall mural at the CSH2014 was hand-painted by local artist Mindy Barker.
The AV Cabinet
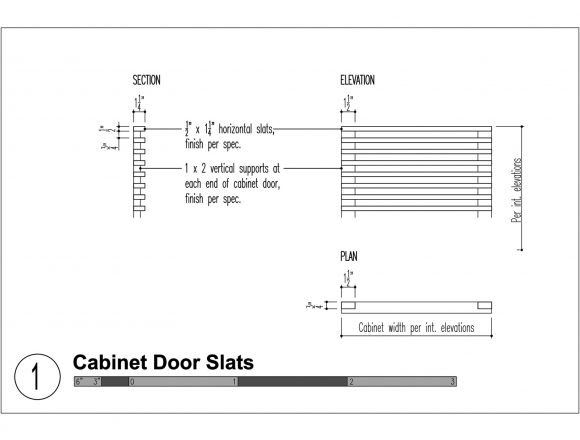
With any flatscreen comes all the AV equipment required for an entertainment system. This might include the cable box, a subwoofer, video games, and if you graduated from college before 2000 there may also be some CDs in there. Additionally, it can be a convenient location for the internet hub, router, wi-fi, etc.) Ideally, this equipment is located in close proximity to the flatscreen, but not close enough to conflict with the firebox clearances. In the BUILD entertainment wall, this cabinet is located below the mantle and adjacent to the firebox. Because of the variety of equipment stored in this cabinet, it typically doesn’t want to be entirely visible, at the same time a solid cabinet panel shouldn’t be used as it will impede the use of remote controls with the entertainment system. The solution here is a slatted cabinet door which allows communication between the remotes and the equipment. Since this cabinet sits below the mantle with tightly spaced slats on its doors, the equipment is concealed from view when standing or walking in the room.
While the composition of the living room entertainment wall appears simple at first glance, the dependencies of each of the components makes it a relatively complicated equation. The design, materials, and dimensions used in the above Case Study House projects are proving to be very successful and you can expect to see similar concepts used as the baseline in several upcoming projects. We like to think that thoughtful design produces answers that are so effective and aesthetically pleasing that it’s hard to improve on them. The living room entertainment wall has been an excellent example of this design evolution.
Cheers from Team BUILD