


The design industry can be an elusive place. By the time a designed object is revealed to the world, be it a house or a toaster, the entire process is typically represented with a few polished and highly refined images. As if to suggest that every line drawn was one genius stroke after the next, as if each model simply improved on the last. These glossy photographs suggest that there was no backtracking or mistakes. No head-scratching, no F-bombs thrown around, no plan B.

The fact of the matter is that this sort of perfection is rarely the case. Not only are failures and unintended results part of the process, but we’d go as far to say that they’re necessary to the sequence of designing something. BUILD LLC recently designed and fabricated an urn for the show The Architect and the Urn and it’s a good example of the messiness of design. Today’s post covers the struggles and the grittiness of achieving an end product.

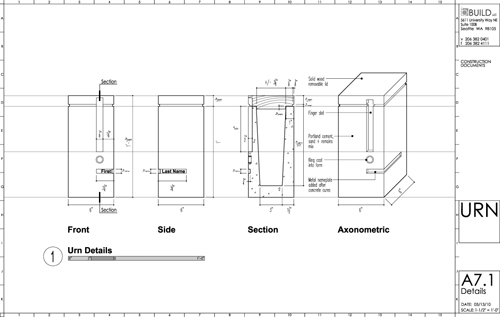
In total we ended up fabricating three urns. Each urn we made was critical to the next evolution and, no matter how much we studied up on the materials and techniques, there’s simply no way to understand materials better than hands-on experience.

As with most concrete projects, the majority of time is spent on crafting the form-work. Initially, we wanted the characteristics of wood grain to translate through to the concrete and we proceeded to build a form-work box from rough-sawn cedar slats. For the first pour we used a “sand topping” concrete mix – basically the aggregate is fine grain sand rather than the pebbles typical of standard concrete. This, we hoped, would allow the concrete mixture to conform to the sharp corners and crevices within the form-work. Because the concept involved using the ash itself as part of the cast object, we added approximately 30 cubic inches of wood ash to emulate cremation remains. We also incorporated a handful of fiberglass reinforcing to hold the mixture together. The box was coated with a form-work release product and the mix was poured. We then applied an orbital sander to the form-work for vibration.


We allowed the concrete to cure for 48 hours and then removed the form-work to find a form that was rough, imprecise and definitely not refined. The concrete did not take well to the crisp corners and the cedar form-work allowed too much of the water to evaporate before it could hydrate the concrete. The fiberglass reinforcing popped out here and there looking like we through grandpa’s toupee in the mix. Also, we were unable to remove the tapered wood form-work for the hollow center. Despite all of this, we were excited to see the first result from the design work and this provided an enormous amount of information for the next iteration.


For the second pour we switched to Ardex K-15, known for its ability to be poured thin and conform to intricate shapes. It also doesn’t require reinforcing up to a thickness of 2½” which eliminated the variable of reinforcement. We cleaned-up and re-used the existing cedar slat form-work for pour #2 and repeated the process.

The second iteration included a hole in the bottom of the urn to hammer out the center form-work. The Ardex product worked quite well and captured the various geometrical moves of the urn. It translated so well, in fact, that it made it clear that the cedar slats were disproportionate to the scale of something as intimate as an urn.

For the third iteration we abandoned the cedar form-work and moved to a laminate that we had lying around the shop (typically used for cabinet drawer boxes). We also took extra care in caulking all the joints and angles on the form-work.

We immediately took to the smooth pour created by the new form-work. The ability of the Ardex mix to pick up the form-work intricacies was refined to a fault however. We found that even the slightest inconformity with the caulk was noticeable. To smooth these out we sanded down the edges a bit – we “eased” the edges in shop-talk. A few chips and dings occurred while getting the form-work off and we filled these with an additional Ardex product called “Feather Finish”, which cures quickly and can be applied in thin amounts.

With a cast object that met our expectations we moved onto the wood top. After a first attempt with solid walnut we moved onto cherry. The red-tones in cherry complimented the concrete color much better than the dark browns of the walnut. The wood top was cut on the table saw and custom fit with a bit of sanding. The steel plate insert was fabricated by our good buddy Aaron Nelson, master of steel working, it was then hand stamped with the name of the deceased.

As the urn project illustrates, the design and fabrication processes are interwoven. Constructing and reconstructing often leads to evolutions in the design of a specific object and, more importantly, refines one’s philosophy of design. The mess, the failures and attacking a design solution from many different angles are all part of the process. It also feels good to get your hands dirty.

For more behind the scenes at BUILD, follow us on Twitter.