


We’ll be the first to admit that we’re no pros when it comes to shooting photos but we’ve come across a couple of tools lately that have allowed us to achieve much greater results with our finished photographs. The options of cameras, software, and techniques within each software program are overwhelming – so we asked some photographers, friends and camera geeks for advice and we put together a great, cost-effective photography kit. We’ve been using this kit for a couple of months now and we think this info could be useful to some of the small shops and solo architect/designers out there. Like us, you probably don’t have a marketing department – but with the right tools, a basic understanding of the technology, and some time, you’ll get much more mileage out of your photos. We’ll try not to bore you with all the data, acronyms and technical geek-speak and just give you the info you need. We’ll also keep this brief; we’re only going to discuss a couple of tools in this post, if you find this information to be useful, let us know and we’ll get more up.
CAMERA
Nikon D80 body ($720 new, $650 used): it’s got all the options you could ever want to experiment with and you can override them all and let the camera decide what’s best simply by turning the knob to “auto”. The camera has auto focus, a self timer, a built-in flash, and gets about 2,000 shots per battery charge. You can use all kinds of lenses on the camera body (wide-angle, zooms, macro, etc.) and the maximum size image is 3,872 pixels by 2,592 pixels – resulting in a 28.7 MB photo, which should be more than enough for architectural shots. The camera hooks straight up to your PC or Mac with a USB cable – no software necessary.
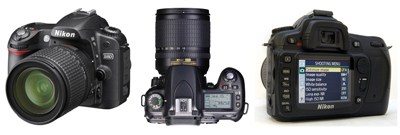
A simplified version of this camera, without so many options, is the Nikon D40 ($500 with a more standard 18-55mm f/3.5 lens): also a great camera, but you’ll still need the wide angle lens listed below (not all lenses will auto focus with this camera – so do your homework before purchasing). For a basic refresher course on the mechanics of SLR (Single-Lens Reflex) cameras refer to this Wikipedia entry.
LENS
Tokina wide-angle 12-24mm F/4 ($450): We’ve found that we really only need one lens for everything we do. Since we’re not taking photos of race cars speeding past, flora & fauna close-ups, or extreme zoom shots of celebrity private lives, a good wide-angle lens does it all. In architecture and interiors the common challenge is to get the whole building or room in one image. This lens can do that without distorting the image too much.

A better quality lens is the Nikon 12-24mm F/4 ($900) but we’ve been happy with the Tokina so far and we don’t know enough about high-end photography to know what we’re missing anyway. For a basic refresher course on the mechanics of a wide-angle lens refer to this Wikipedia entry.
TRIPOD & HEAD
Manfrotto 055XPROB Tripod ($175) & Manfrotto 484RC2 Head ($50): We went with a tripod that will last the rest of our lives. We figure that cameras are going to continue to get increasingly clever, but we’re betting that the tripod concept isn’t going to change much. Unfortunately, nice tripods require a head (which connects the tripod to the camera like a middle-man) and it must be purchased separately. We’re not sure why this is but after dropping fourteen-hundred bucks on a camera what’s another fifty.
The above camera equipment can be purchased through Amazon or if you’re a Seattleite head on down to Glazers (they sell used equipment as well).
SOFTWARE
Adobe CS2 ($200 on EBay): Although this isn’t the latest and greatest of the Adobe graphic packages it does everything you’ll need as an architect or designer. The newest version of CS3 costs about $1,700. Both packages include several software applications – most importantly Photoshop and Illustrator.

Okay, that’s the hardware and software (totaling about $1,600 + tax & shipping), now let’s get to some techniques.
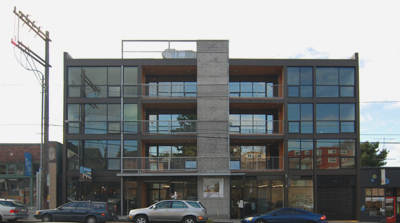
WIDE-ANGLE LENS COMPARISON: Obviously the greatest advantage of a 12mm wide-angle lens is that it allows you to get more building and surroundings into a single frame. Here’s a quick experiment shooting approximately 70’ away from the object of interest (in this case the Park Modern was kind enough to be our model).

Using the entirely automatic Canon Powershot SD450 (a good point & shoot camera) you are left with 3 rather uninspiring choices – either cut some of the building off (left), show a series of images as a collage (center), or awkwardly splice a series of photographs together (right).
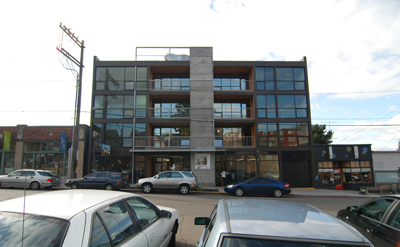
While this shot by the D80 and wide-angle lens is not of finished quality (yet) it gets the entire building into a single frame and then some. We’ll need the extra space around the building a little later in the process.
Often with interior shots there only several feet to work with and get the shot you want. In this example of a built-in closet there was only six feet of back-span. Once again the point and shoot requires many photos whereas the wide angle lens can get most of the space in one frame.
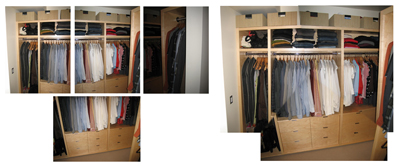
Canon Powershot options: collage (above left) or splice (above right).

The wide-angle lens gets most of the closet onto one image.
Few interior shots offer the amount of light that a point-and-shoot camera requires, as is the case with the closet above. This is where the tripod comes into play. Once the camera is mounted on the tripod the shutter can be opened for longer, subsequently allowing more light in. A shutter speed of 1/60th of a second is the maximum amount of time you should use without a tripod. With the tripod, low light conditions are no longer a barrier to good quality photos. Notice in the Powershot collage above that the camera changes the auto settings from one shot to the next, some shots are lighter and some darker, making it more difficult to splice the photos together.
PERSPECTIVE CROP: Once you’ve got the shot it’s time to sharpen it up in Adobe Photoshop. The single greatest tool we’ve found so far for architectural shots is the crop & perspective tool. This tool allows you to straighten out the photo and keep the vertical lines perfectly vertical, a must for professional architectural shots.


Click on the crop tool in the toolbar (on the left in the screen shot above). Click and drag the crop tool to the desired crop of the image. Then make sure the perspective option is checked in the toolbar (on the right in the screen shot above) and move the perspective points to stretch the image as need be to get the vertical lines vertical. This typically requires a bit of back and forth. You should end up with an image that is both cropped and that has perfectly vertical lines.

CONTRAST: Another handy post-photo tool is the contrast tool. In this particular shot we brought the contrast down a bit to lighten up the building and enhance the clouds and reflections.
COLOR BALANCE: The color balance tool is also a favorite; in this shot we bumped up the reds and yellows a bit so that the wood tones in the building are more prominent.

It’s difficult to see all the results when the shots are only 400 pixels wide but you get the point. The single most important tool is looking to the masters. As humbling as it is to analyze the work of the professionals we find it’s very helpful to the process of improving our own photography skills. Here are a couple of top-notch photographers we look to for inspiration: Chase Jarvis, Hisao Suzuki, Art Grice, Benjamin Benschneider, Bernd & Hilla Becher, Candida Hofer, and Julius Shulman.